Set up the x402 facilitator
To build premium research feeds, you first need a payment facilitator. The facilitator acts as the bridge between your API and the x402 payment standard, handling the cryptographic proof that a user has paid for access. Without this setup, your endpoints cannot verify transactions or grant data access.
We will use the Coinbase Developer Platform (CDP) Facilitator for this guide. It provides the necessary infrastructure to manage wallets and verify payments without building a custom payment gateway from scratch. This approach keeps your code clean and focused on the research data itself.
Follow these steps to initialize the connection.
Sign up for a Coinbase Developer Platform account if you don't have one. Create a new project within the dashboard and note your API key and secret. These credentials are required to authenticate your facilitator requests. Keep these keys secure; they control your payment processing capabilities. Learn more about the CDP Bazaar discovery layer.
Install the official x402 library in your project directory. This SDK provides the functions needed to generate payment requests and verify proofs. Run npm install x402 (or your package manager equivalent) to add the dependency. Ensure you are using a version compatible with your runtime environment.
Initialize the facilitator client using your CDP credentials. Pass your API key and secret to the constructor. This step establishes the secure channel between your application and the payment network. The client will handle token signing and proof verification automatically. Check the official x402 introduction for configuration details.
Run a test transaction to ensure the facilitator is responding correctly. Send a small test payment to your endpoint and confirm that the proof is validated. If the test fails, check your API key permissions and network connectivity. Successful verification means your infrastructure is ready for premium data.
Once the facilitator is connected, your endpoints can start accepting x402 payments. The next step is to define your research data schema and link it to the payment verification logic.
Configure the Payment-Gated API
To turn an existing research endpoint into an x402-compliant service, you need to wrap your data logic with middleware that intercepts the request lifecycle. The goal is simple: the server should pause data delivery until a valid 402 payment proof is attached to the HTTP request. This approach keeps your existing database queries intact while adding a cryptographic payment layer on top.
Start by integrating an x402 facilitator, such as Thirdweb’s implementation, into your backend. This component handles the blockchain interaction, allowing your API to accept USDC or other stablecoins without managing private keys or smart contracts directly. It acts as the bridge between your HTTP endpoint and the payment network, ensuring that payment proofs are verified against the correct chain and token standards.
Create a middleware function that runs before your main data handler. This function must inspect the incoming HTTP request for an x-payment-proof header. If the header is missing or the proof is invalid, the middleware should reject the request immediately. This step ensures that no computational resources are wasted processing requests from non-paying clients.
Your API must strictly adhere to the x402 specification regarding status codes. If a request lacks a valid payment proof, return a 402 Payment Required status along with the payment instructions. Once the facilitator confirms the payment, return a 200 OK status with the research data. Mixing these codes or returning 200s without payment verification breaks the protocol and exposes your data.
When returning a 402 status, include a JSON body that details how the client should pay. This typically includes the token address, the amount due, and a unique invoice ID. This structure allows x402-compliant clients to automatically generate the payment transaction and attach the resulting proof to a retry request.
Use an x402-compliant browser extension or client to test your endpoint. Send a request without payment to verify the 402 response, then send a second request with a valid proof to ensure the 200 response contains the expected research data. This validation step is critical for high-stakes financial data, where any leakage or error can have significant consequences.
Once configured, your endpoint will seamlessly gate access to premium research feeds. The x402 protocol ensures that every data request is tied to a verified payment, creating a trustless environment for selling financial data.
List the endpoint in the Bazaar
Discovery is the bottleneck for AI agent commerce. If an endpoint isn’t registered, it doesn’t exist to the machine economy. The CDP Bazaar acts as the catalog, allowing agents to find and verify your x402-enabled service before they attempt a transaction.
To register, you submit a manifest to the CDP Facilitator. This manifest defines the service’s identity, including the API endpoint URL, the payment token (usually USDC), and the metadata schema. Agents use this data to validate that the service meets their security and cost requirements.
Required manifest fields
Your submission must include the following core attributes:
- Service URL: The exact path where the x402 endpoint resides.
- Payment Token: The stablecoin contract address accepted for payment.
- Metadata Schema: A JSON schema describing the data structure returned by the endpoint.
- Access Policy: Any rate limits or authentication requirements the agent must satisfy.
Validation and indexing
Once submitted, the Facilitator indexes the service. This process is not instantaneous; it allows for basic validation of the endpoint’s responsiveness and x402 compliance. You should monitor the indexing status to ensure your service is marked as discoverable.
Note: Ensure your endpoint returns a valid 200 OK with a correct x402 header before listing. An endpoint that fails basic connectivity checks will be rejected by the Bazaar indexer.
Error handling during registration
Registration failures usually stem from malformed JSON in the manifest or an unreachable API endpoint. Check your server logs for connection attempts from the Facilitator’s validation bots. If the endpoint times out, the listing will fail. Adjust your firewall rules to allow traffic from the CDP validation range if necessary.
After successful indexing, your premium research feed is live. Agents can now discover, verify, and purchase access automatically.
Handle failed payments and retries
Financial data feeds operate in a high-stakes environment where a single dropped transaction can break an automated trading bot or delay a critical compliance report. Because x402 handles payment at the protocol level, you cannot rely on a simple "try again" button. You must build robust error handling that distinguishes between transient network glitches and permanent authentication failures.
When a client sends a x-payments header, the server must validate the proof immediately. If the proof is malformed or expired, return a 402 Payment Required with the specific Accept-Payment URI. This allows the client’s retry logic to request a fresh payment challenge rather than repeating the same failed transaction. Do not return a generic 400 Bad Request; that forces the client to guess the next step, wasting API quota and time.
For transient errors—such as a Base network congestion spike or a temporary RPC timeout—implement exponential backoff. Start with a 1-second delay, then 2, 4, and 8 seconds, capping retries at three attempts. This prevents your server from being overwhelmed by a storm of retry requests during network hiccups. If the payment proof is valid but the underlying data service is down, return a 503 Service Unavailable with a Retry-After header, not a payment error.
Security checks are equally critical. Always verify that the x-payments header corresponds to the exact resource requested. A valid proof for a GET /api/v1/prices endpoint should not grant access to GET /api/v1/admin/users. Validate the nonce to prevent replay attacks, where a malicious actor captures a valid payment proof and replays it for future requests. Use a short-lived nonce cache (e.g., 5 minutes) to ensure each payment is used only once.
Pre-launch Checklist
-
Verify x-payments header validation against Accept-Payment URIs
-
Implement exponential backoff for network timeouts (1s, 2s, 4s, 8s)
-
Cache nonces for 5 minutes to prevent replay attacks
-
Return 402 with specific error codes for malformed proofs
-
Return 503 with Retry-After for service downtime, not payment errors
Monitor revenue and usage metrics
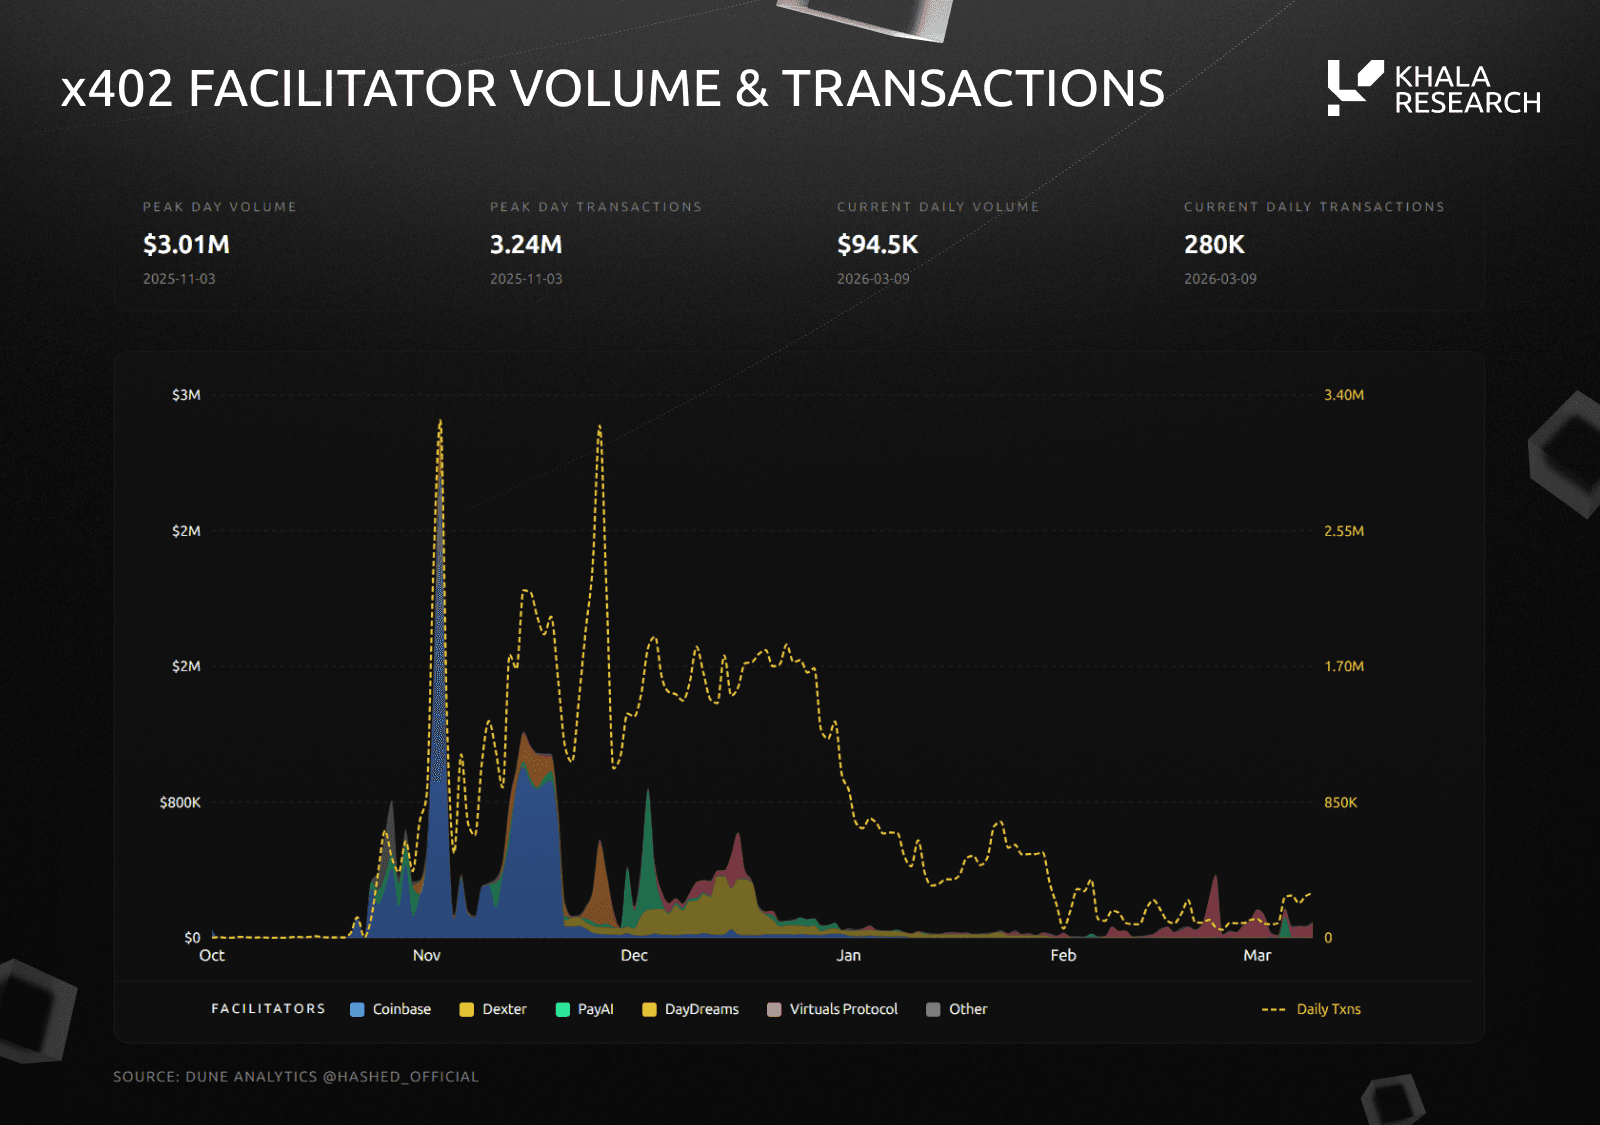
Track your x402 endpoint performance by observing on-chain transaction volume and agent engagement. Since payments settle instantly on Base, you can use block explorers like Basescan to verify each successful request. This direct visibility is essential for high-stakes financial data, where accurate billing and uptime proof are non-negotiable.
Focus on two core metrics: transaction throughput and unique agent IDs. High throughput indicates strong demand, while a growing number of unique agents suggests your data feed is becoming a standard in your niche. You can cross-reference these numbers with your server logs to detect anomalies, such as sudden spikes that might indicate scraping attempts or bot activity.
For a quick check on settlement values, keep an eye on USDC prices. Fluctuations in the stablecoin can impact your effective revenue per request, so monitoring the price helps you adjust your pricing tiers if needed.
Common x402 integration: what to check next
Building x402 endpoints for premium research feeds requires handling microtransactions with precision. Below are the most frequent technical hurdles developers face when implementing the x402 standard.
Helpful gear
Use these product recommendations as a starting point, then choose the size, material, and price point that fit how you actually use the gear.


As an Amazon Associate, we may earn from qualifying purchases.
No comments yet. Be the first to share your thoughts!