Turn data into onchain revenue
Traditional API monetization relies on friction-heavy payment gateways, subscription management platforms, and manual invoice reconciliation. For premium research feeds, this overhead often eats into margins before the data ever reaches the client. x402 changes the equation by embedding payment logic directly into the HTTP protocol.
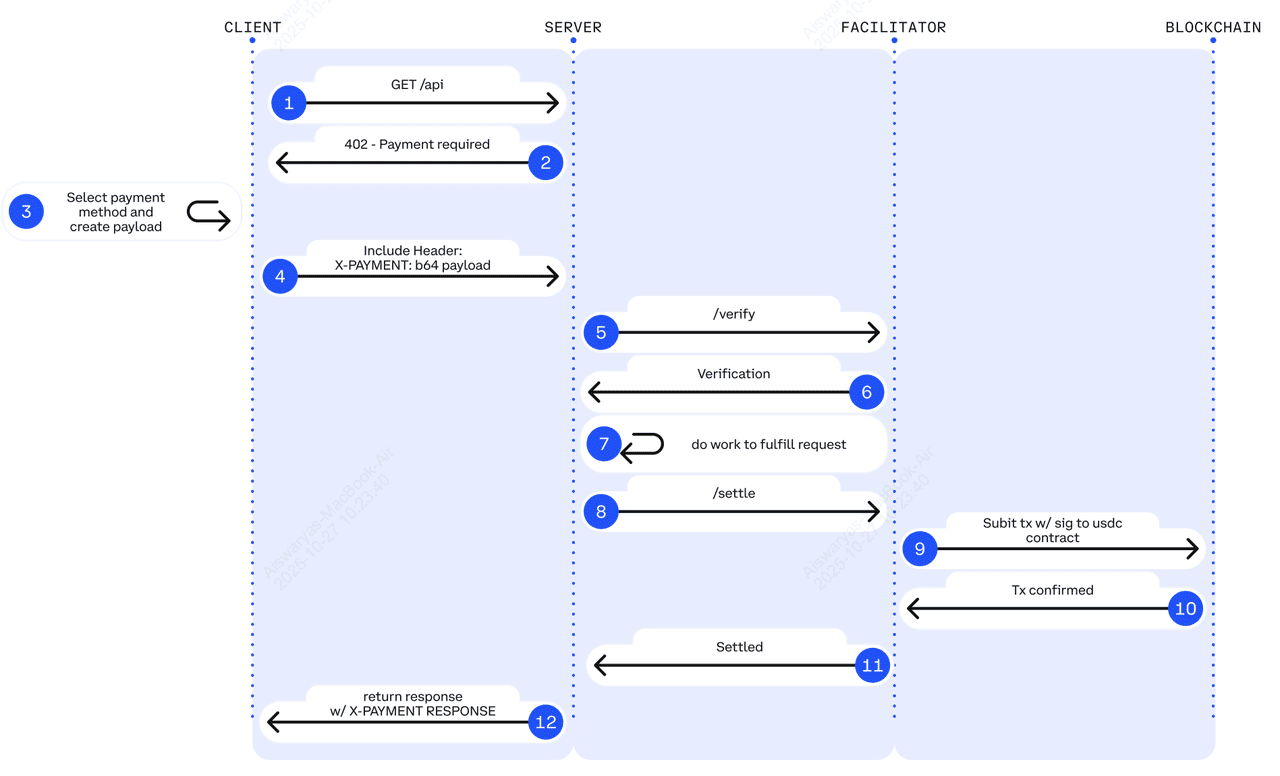
When a client requests a premium endpoint, the server responds with a 402 Payment Required status. The request includes a crypto payment proof. Once the blockchain confirms the USDC transfer, the server delivers the data. This process removes intermediaries, reduces settlement time to seconds, and enables micropayments that were previously economically unviable due to high transaction fees.
By leveraging x402 endpoints for premium research feeds, you can monetize granular data access—such as single-query market insights or real-time sentiment scores—without requiring user accounts or credit card onboarding. This approach aligns perfectly with the high-frequency, low-latency needs of modern algorithmic traders and AI agents.
Set up the x402 facilitator
To monetize your premium research feed, you first need a bridge between your API and the blockchain. The x402 facilitator handles this by verifying payments in USDC before allowing access to your data. This setup ensures that only users who have paid receive the API response.
We will use the official facilitator provided by Coinbase. It simplifies the integration by managing the payment verification logic, allowing you to focus on building the research data itself. Follow these steps to install the dependencies and configure your environment.
Open your terminal and navigate to your project directory. Run the following command to install the x402 facilitator package from npm. This adds the necessary libraries to your project.
npm install @coinbase/x402
Create a .env file in your root directory. You need to define the X402_FACILITATOR_URL and your CHAIN_ID. For most premium research feeds, Base is the recommended chain due to low gas fees. Set these variables to match your deployment environment.
X402_FACILITATOR_URL=https://facilitator.cdp.coinbase.com
CHAIN_ID=8453
Import the facilitator into your API route handler. Initialize it using the environment variables you just set. This instance will be used to verify incoming requests and check for valid USDC payments before returning your research data.
import { x402 } from '@coinbase/x402';

const facilitator = new x402({
  facilitatorUrl: process.env.X402_FACILITATOR_URL,
  chainId: parseInt(process.env.CHAIN_ID)
});


As an Amazon Associate, we may earn from qualifying purchases.
Add payment middleware to routes
x402 Endpoints for Premium Research Feeds works best as a clear sequence: define the constraint, compare the realistic options, test the tradeoff, and choose the path with the fewest hidden costs. That order keeps the advice usable instead of decorative. After each step, pause long enough to check whether the recommendation still fits the reader's actual situation. If it depends on perfect timing, unusual access, or a best-case budget, include a simpler fallback.
Test the payment flow
Before you push your x402 endpoints for premium research feeds to production, you need to verify that the payment handshake works exactly as intended. This section walks you through the critical checks to ensure your API correctly handles the 402 status code and delivers data only after payment is settled.
1. Simulate a 402 Response
Start by sending a request to your endpoint without any payment credentials. Your API should respond with a 402 Payment Required status code. This is the core signal that tells clients—whether human users or AI agents—that access is restricted until payment is made. Ensure the response includes clear instructions on how to proceed, such as a link to your payment gateway or specific header requirements.
2. Process a Test Transaction
Next, send a request with valid payment credentials. If you are using USDC on a Layer 2 network like Base, this transaction should settle with minimal gas fees. Verify that your backend detects the incoming payment and validates the transaction hash. According to official documentation, x402 charges zero protocol fees, so you only need to account for blockchain gas costs, which are typically fractions of a cent on L2s [[src-serp-4]].
3. Confirm Data Delivery
Once the payment is confirmed, your API must immediately grant access to the premium research data. Test this by sending the same request again with the payment proof attached. The response should now be a 200 OK status code containing the requested dataset. If the data remains locked, your payment verification logic needs adjustment.
4. Verify Edge Cases
Finally, test what happens when a payment fails or is revoked. Ensure your system correctly reverts to a 402 state if the transaction is invalid or if the user’s balance drops below the required threshold. This robustness is essential for maintaining trust in your x402 endpoints for premium research feeds.
Send a request without payment credentials. Verify the API returns a 402 Payment Required status code with clear next steps.
Send a request with valid payment credentials. Verify your backend detects the USDC transaction and validates the hash.
Resend the request with payment proof. Verify the API returns a 200 OK status code with the premium research data.
Common x402 payment: what to check next
When building x402 endpoints for premium research feeds, two questions come up most often: how much does it cost to process a payment, and do you need a specific cryptocurrency token? The answers are simpler than you might expect.
What is the gas fee for x402?
x402 charges zero protocol fees. You only pay the blockchain gas costs required to settle the transaction. Because x402 is designed to work on Layer 2 networks like Base, these costs are minimal—often as low as $0.001 per transaction. This low overhead is what makes micropayments for data access economically viable.
Does x402 have a token?
The name comes from HTTP 402: Payment Required, a status code unused since the 1990s. The project enables automatic payments in USDC, so there is no native x402 token. Despite this, the ecosystem is growing, with various community coins like PAYAI and UB gaining traction. You can monetize your research feeds using standard USDC without managing a custom token.
No comments yet. Be the first to share your thoughts!