Why x402 fits agent commerce
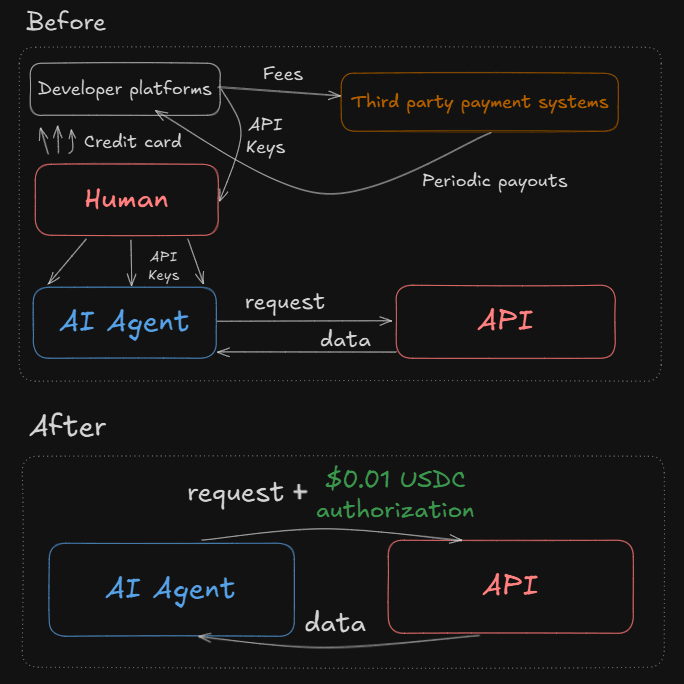
Traditional billing models break down when AI agents need to access premium research feeds. You cannot easily set up recurring credit card charges for a micro-service that runs for three seconds, nor can you rely on manual approval for every API call. x402 solves this by enabling instant, machine-to-machine payments directly over HTTP, removing the friction of traditional gateways.
The protocol leverages the HTTP 402 "Payment Required" status code to create a native extension of web standards. Instead of redirecting users to a third-party checkout page or managing complex merchant accounts, an x402 endpoint accepts payment in real-time as part of the request-response cycle. This makes it ideal for high-frequency data access where latency and user intervention must be minimized.
For premium research feeds, this means your API can instantly verify payment and deliver data without waiting for batch processing or bank settlements. Agents can autonomously negotiate prices, execute transactions, and retrieve insights in a single, seamless interaction. This approach is redefining how financial services handle autonomous payments, allowing for truly scalable, programmatic commerce.
For more details on the ecosystem and integration paths, visit x402.org/ecosystem.
How the 402 handshake works
x402 Endpoints for Premium Research Feeds works best as a clear sequence: define the constraint, compare the realistic options, test the tradeoff, and choose the path with the fewest hidden costs. That order keeps the advice usable instead of decorative. After each step, pause long enough to check whether the recommendation still fits the reader's actual situation. If it depends on perfect timing, unusual access, or a best-case budget, include a simpler fallback.


Setting up the endpoint logic
Implementing an x402 endpoint for premium research feeds requires shifting from simple API authentication to transaction verification. The core responsibility of your server is to validate that a client has paid the required fee before releasing sensitive data. This process hinges on parsing the PaymentRequirements header and verifying the on-chain transaction against your configured payment address.
Start by defining the payment terms in your response headers. When a client makes an initial request, your server should respond with a 402 Payment Required status code and a PaymentRequirements header. This header must include the payment_uri (your wallet address), the payment_method (typically crypto), and the payment_amount in the smallest unit of the currency (e.g., wei for USDC). According to Coinbase’s official quickstart for sellers, this header acts as the invoice that the client’s agent or wallet uses to construct the transaction.
Once the client submits a subsequent request with the Authorization header containing the proof of payment, your server must verify it. This involves checking the transaction hash, confirming the recipient address matches your payment URI, and ensuring the amount meets or exceeds the requested fee. For USDC transactions, you’ll need to account for decimals (usually 6) when comparing amounts. If the verification fails, return a 402 again; if it succeeds, proceed to serve the premium research data.
To help contextualize the micro-transaction costs involved in these endpoints, you can monitor live USDC prices. This ensures your pricing model remains competitive against standard API subscription fees while covering gas costs for your users.

Integrating with AI agents
Autonomous agents built on frameworks like LangChain or AutoGen can now hold digital wallets and execute x402 payments without human intervention. This capability transforms premium research feeds from static data sources into programmable, pay-per-use resources that agents can access on demand.
To enable this, you configure the agent’s execution environment to include a compatible crypto wallet provider. The agent then intercepts HTTP requests to x402-enabled endpoints, automatically signing and sending the required micro-payment when a 402 response is received. This process is handled transparently within the agent’s tool-calling loop, allowing it to fetch data, pay, and continue analysis in a single workflow.
Implementation typically involves setting up environment variables for wallet credentials and ensuring the agent’s HTTP client respects the x402 protocol headers. By integrating with official x402 documentation and leveraging browser-based execution environments like Browserbase, developers can create robust, self-sustaining research pipelines that scale with data needs rather than budget constraints.
This approach reduces operational friction significantly. Instead of manual API key rotations or subscription management, the agent manages its own access rights through crypto transactions, ensuring that only authorized, paid queries are processed. For high-frequency research tasks, this autonomy is essential for maintaining real-time data access without constant oversight.
Choosing the right x402 facilitator
Implementing x402 endpoints requires a facilitator to bridge HTTP requests with on-chain payments. The choice of provider often depends on your existing tech stack and the specific chains you need to support. While the protocol is agnostic, the developer experience varies significantly between major facilitators like Coinbase CDP, Thirdweb, and Nethereum.
For teams already deep in the Coinbase ecosystem, the Coinbase Developer Platform (CDP) offers a streamlined integration path. It simplifies the boilerplate required to handle USDC payments and is particularly effective for sellers looking to monetize APIs quickly. If your infrastructure leans heavily on EVM-compatible chains and you prefer a more abstracted SDK approach, Thirdweb provides a robust facilitator that integrates well with modern web frameworks.
Nethereum remains a strong option for developers working in .NET environments or those who need granular control over the payment flow. It exposes the raw HTTP 402 response mechanics, allowing you to define custom payment requirements and handle the transaction logic manually. This flexibility comes at the cost of increased implementation effort compared to the more opinionated CDP or Thirdweb solutions.
| Facilitator | Best For | Chain Support | Integration Level |
|---|---|---|---|
| Coinbase CDP | CDP-native teams | Base, Ethereum | Low-code SDK |
| Thirdweb | Web3-native dApps | Multi-chain EVM | Middleware SDK |
| Nethereum | .NET / Custom Logic | Multi-chain EVM | Low-level SDK |


As an Amazon Associate, we may earn from qualifying purchases.
Testing the payment flow
Before you push your x402 endpoint to production, you need to ensure the handshake between client and server works flawlessly. This isn't just about checking if the API returns data; it's about verifying that the cryptographic payment proof is valid and that data remains locked until that proof arrives.
1. Verify the 402 Challenge Response
Start by sending a GET request to your endpoint without any payment headers. According to the x402 specification, your server must respond with a 402 Payment Required status code. This response should include a PaymentRequirements header detailing the exact amount, token, network, and destination address (payTo) needed to access the content. If you get a 200 OK or a 404, your gate isn't working.
2. Simulate the Payment Transaction
Use a testnet environment to simulate the actual crypto transfer. Send the required amount to the payTo address specified in the challenge. Once the transaction is broadcast, wait for the necessary block confirmations. You can use a block explorer to verify the transaction hash and ensure the funds have reached the destination wallet. This step confirms your network configuration is correct and that your endpoint is listening for the right chain.
3. Validate the Payment Proof
This is the critical security check. When the client retries the request, it must include a PaymentProof header containing the transaction details. Your server needs to verify this proof against the blockchain. Check that:
- The transaction hash matches the one recorded in the proof.
- The amount sent meets or exceeds the
PaymentRequirementsamount. - The recipient address matches your configured
payToaddress. - The transaction is confirmed on the specified network.
If any of these checks fail, reject the request with a 402 again. Never trust the client-side proof without on-chain verification.
4. Confirm Data Unlock
Once the proof is valid, your endpoint should return the premium content with a 200 OK status. Verify that the data payload is complete and matches what you expect. At this point, the x402 endpoint has successfully mediated the exchange: payment was verified, and data was released. Only after passing all these checks should you consider your endpoint ready for live premium research feeds.
Send a GET request without payment headers. Expect a 402 status with PaymentRequirements in the header.

Use testnet to send funds to the payTo address. Verify the transaction hash on a block explorer.
Check the PaymentProof header. Ensure the hash, amount, and recipient match the blockchain record.
Retry the request. Confirm a 200 OK response with the full premium content payload.
No comments yet. Be the first to share your thoughts!