What x402 Enables for Research Data
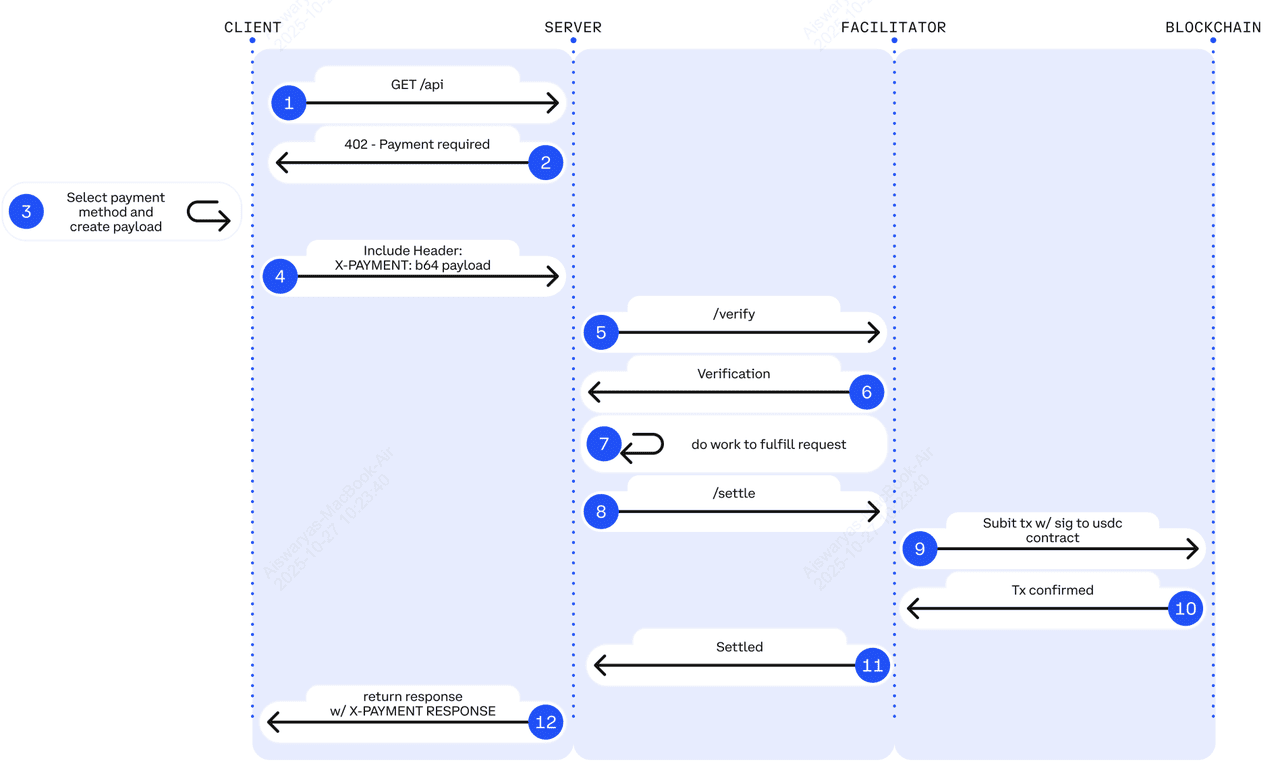
x402 is a protocol that reactivates the HTTP 402 status code, originally defined in 1995 but never widely implemented. Developed by the Coinbase Development Platform team, it allows any API or web service to require payment before serving content. For premium research feeds, this means machine-to-machine transactions happen natively within the request header, eliminating the need for traditional payment gateways.
The primary friction in API monetization has always been identity and billing. Traditional systems require user accounts, credit card storage, and complex subscription management. x402 removes these intermediaries. A client simply includes a USDC payment in the HTTP request. If the payment is valid, the server responds with the data. If not, it returns a 402 status code with instructions on how to pay.
This approach is particularly valuable for research data, where access is often gated behind high-value, low-frequency requests. Instead of managing a separate billing portal, researchers can integrate payment directly into their data ingestion pipelines. The result is a seamless, automated flow where access is granted instantly upon payment confirmation, with no manual invoicing or account verification required.
Set Up the x402 Facilitator
The x402 facilitator acts as the middleman between your research feed and the user’s wallet. It handles the heavy lifting of routing payments, validating tokens, and ensuring the API only serves data once the transaction clears. You can build this layer using the Coinbase Developer Platform (CDP) Facilitator or Thirdweb’s implementation. Both options provide the necessary infrastructure to handle USDC payments without requiring users to create accounts or manage complex private keys.
1. Install the Facilitator Package
Start by adding the facilitator package to your project. If you are using the CDP approach, install the official SDK. For Thirdweb, use their npm package. This library provides the functions you need to parse x402 headers and verify signatures.
npm install @coinbase/developer-platform-facilitator
# or
npm install @thirdweb-dev/contracts
2. Configure Environment Variables
You need to configure your environment with the necessary credentials. This includes your wallet private key, the USDC contract address for your chosen network (Ethereum, Base, or Polygon), and your facilitator endpoint URL. Keep these variables secure and never commit them to version control.
export PRIVATE_KEY="your_wallet_private_key"
export USDC_ADDRESS="0x833589fCD6eDb6E08f4c7C32D4f71b54bdA02913"
export FACILITATOR_URL="https://api.cdp.coinbase.com/platform/v1/facilitator"
3. Initialize the Facilitator Instance
Create a new instance of the facilitator in your application code. Pass in your configuration settings, including the network and wallet details. This instance will handle the payment verification logic for your API endpoints.
import { Facilitator } from '@coinbase/developer-platform-facilitator';

const facilitator = new Facilitator({
  privateKey: process.env.PRIVATE_KEY,
  usdcAddress: process.env.USDC_ADDRESS,
  facilitatorUrl: process.env.FACILITATOR_URL,
});
4. Implement Payment Verification Middleware
Add middleware to your API routes that checks for the x402 header. When a request comes in, the middleware should verify that the payment has been successfully routed through the facilitator. If the payment is missing or invalid, return a 402 status code.
app.use('/api/research-feed', async (req, res) => {
  const isValid = await facilitator.verifyPayment(req);
  if (!isValid) {
    return res.status(402).send('Payment Required');
  }
  // Proceed with serving data
});
5. Test with a Sample Request
Use a tool like Postman or curl to send a test request to your endpoint. Include the x402 header with a valid payment signature. Verify that the facilitator correctly processes the payment and allows access to the research data. This step ensures your setup is working before you expose it to users.
Add the CDP or Thirdweb SDK to your project dependencies to enable payment routing.

Set your wallet private key, USDC contract address, and facilitator endpoint in your .env file.
Create a new facilitator object in your code using the configuration from your environment.
Add middleware to your API routes to check for valid x402 headers and verify payments.
Send a test request with a valid payment signature to ensure the endpoint responds correctly.


As an Amazon Associate, we may earn from qualifying purchases.
Integrate USDC Payments into Your API
To turn a standard research feed into an x402-compliant endpoint, you need to modify your server logic to intercept requests and verify payment proofs before returning data. The x402 standard, developed by the Coinbase Development Platform, repurposes the HTTP 402 status code to create a universal protocol for digital payments. Instead of relying on third-party payment gateways or user accounts, your API directly accepts USDC on the Base network.
This integration requires two main changes to your existing endpoint: returning a 402 response with payment instructions when no proof is present, and validating the Payment-Payment-Payment header when one is provided. Below is the step-by-step process to implement this flow.
When a client requests premium data without a valid payment proof, your API must respond with an HTTP 402 status code. This response must include a JSON body containing the payment_uri, which tells the client where to send the USDC, and the payment_schema, which specifies the contract and token details. This structure allows automated agents to understand exactly how to pay for the resource.
{
  "payment_uri": "https://base-sepolia.blockscout.com/address/0x...",
  "payment_schema": "eip7377:84532:0x...",
  "amount": "1000000",
  "currency": "USDC"
}
Once a client has sent the payment, they include a Payment-Payment-Payment header in their subsequent request. This header contains a cryptographic proof that the transaction occurred on-chain. Your server needs to parse this header and verify the signature against the public key associated with the sender. If the proof is invalid or expired, reject the request with a 402 status again.
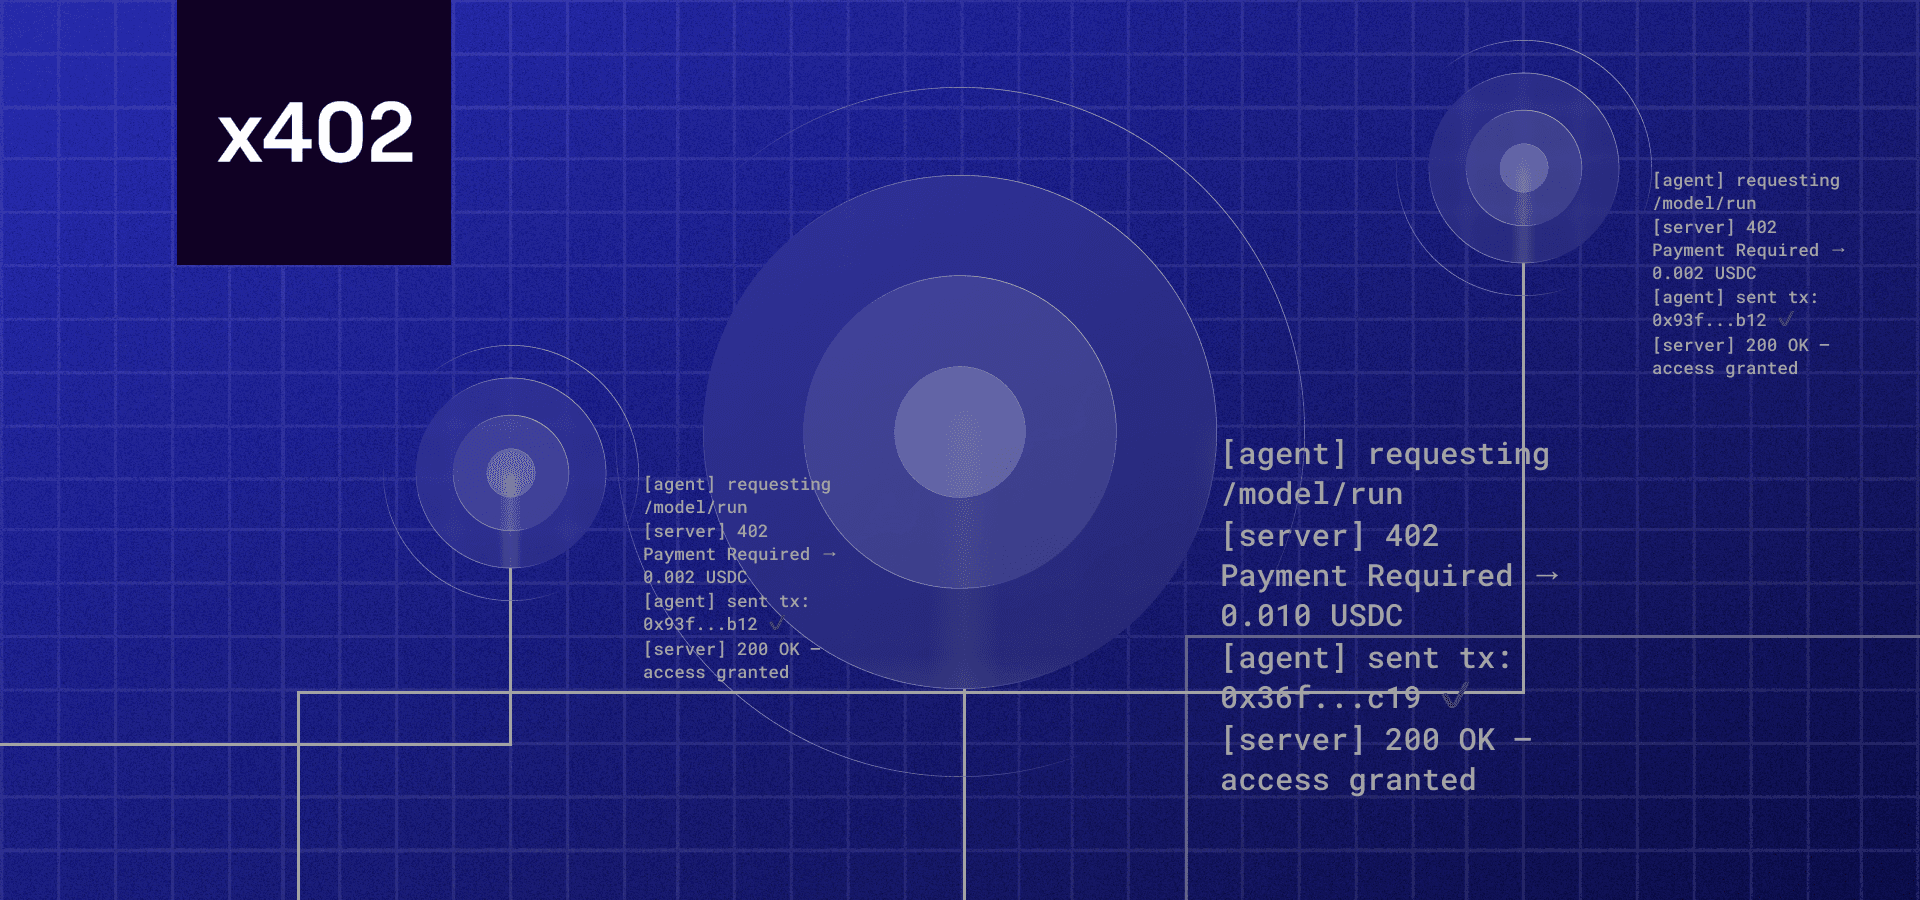
After the payment proof is successfully verified, your API should return the requested research data with an HTTP 200 status code. This data can be returned as JSON, CSV, or any other format your clients expect. Because the payment is settled on-chain, you do not need to maintain a separate database of user subscriptions or handle recurring billing logic.
By following this sequence, you create a self-contained payment system that integrates directly into your API's response cycle. This approach eliminates the friction of traditional payment processors and allows for instant, automated access to your premium research feeds.
List your endpoint in the Bazaar
Discovery is the bottleneck for automated AI agents. If your research feed isn't cataloged, agents can't find it, and they certainly can't purchase it. The x402 Bazaar acts as the discovery layer, allowing developers and AI agents to browse and search for x402-enabled services cataloged through the Coinbase Developer Platform (CDP) Facilitator.
Registering your endpoint is a straightforward API call. You will use the CDP Facilitator to submit your service metadata, including your endpoint URL, pricing in USDC, and schema details. Once submitted, your feed becomes visible in the Bazaar index.
This step bridges the gap between a private API and an automated economy. Without this registration, your premium data remains invisible to the very agents designed to consume it.
Common Setup Mistakes to Avoid
Even with a straightforward protocol, small oversights in payment verification can break your endpoint or leave you exposed to unpaid requests. The x402 standard relies on strict HTTP semantics and cryptographic validation. If you skip these checks, your premium research feed becomes a public resource.
Failing to Validate the Payment Signature
The most critical error is accepting the x-pay header without verifying its signature. The header contains a signed transaction receipt proving that USDC was transferred on Base. If you do not verify this signature against the official x402 specification, an attacker can forge the header and access your data for free.
Always parse the signature and confirm the transaction hash matches the one recorded on the blockchain. Do not trust the client-side claim alone. Use a lightweight verifier library or call the Base block explorer to confirm the payment status before serving the response.
Misconfiguring Gas Fees on Base
Another frequent pitfall involves gas fee assumptions. x402 payments are settled in USDC on Base, but the client must still cover transaction gas. If your endpoint expects a payment that is too small relative to the current gas price, the transaction may fail or be rejected by the network.
Check the current gas prices on Base before setting your minimum payment threshold. If your research feed costs $0.10 per query, ensure that the gas cost does not exceed the value of the content. Otherwise, users will face high failure rates, and your conversion metrics will suffer.

-
Verify the x-pay signature against the Base blockchain.
-
Confirm the transaction hash is valid and confirmed.
-
Set minimum payment thresholds above current Base gas costs.
-
Test with a small USDC amount to ensure end-to-end flow.
-
Log failed signature verifications for security auditing.
No comments yet. Be the first to share your thoughts!