How x402 endpoints handle premium research
x402 replaces static API keys with an HTTP extension: the server responds with a 402 Payment Required status until the client presents a valid crypto payment in the request headers. This turns every API call into a transaction, allowing you to gate high-value financial data directly from AI agents.
For premium research feeds, this eliminates subscription management portals. You price data per request or per megabyte. When an AI agent queries your endpoint, it resolves the payment challenge—typically using USDC via a facilitator like Thirdweb’s x402 service. This shifts the relationship from a long-term contract to a utility-based interaction, similar to paying for electricity by the kilowatt-hour.
Set up the x402 facilitator
To build premium research feeds that actually get paid, you need a payment facilitator. The x402 protocol relies on a middleware layer to verify that a buyer has transferred funds before releasing data. We use the Coinbase Developer Platform (CDP) SDK for this guide, as it provides official, production-ready tooling for x402 integration. This approach handles the complex cryptographic verification of ERC-20 payments, allowing your backend to focus on delivering high-quality data.
1. Install the CDP SDK
Start by adding the official Coinbase CDP package to your project. This library contains the necessary functions to interact with the x402 standard and verify transaction signatures.
npm install @coinbase/coinbase-sdk
2. Configure your environment
Create a .env file to store your Coinbase API credentials. You will need the API_KEY and API_SECRET from your Coinbase Developer Dashboard. These keys allow your facilitator to authenticate with the blockchain network and verify incoming payment proofs.
COINBASE_API_KEY=your_api_key_here
COINBASE_API_SECRET=your_api_secret_here
3. Initialize the facilitator
In your backend entry point, initialize the CDP client using your environment variables. This creates the instance that will handle payment verification for all your x402 endpoints.
import { Coinbase } from "@coinbase/coinbase-sdk";

// Initialize the client with your credentials
const client = new Coinbase({
  apiKey: process.env.COINBASE_API_KEY,
  apiSecret: process.env.COINBASE_API_SECRET,
});
4. Verify payments in your route
When a request hits your endpoint, the buyer must include a payment proof in the headers. Use the CDP SDK to verify this proof. If the verification fails, return a 402 Payment Required error. If it succeeds, proceed with delivering your premium research data.
This verification step is the core of the x402 protocol. It ensures that only paying users can access your endpoints, creating a sustainable model for premium research distribution.
Add the official Coinbase CDP package to your project dependencies using your preferred package manager.
Store your Coinbase API keys in environment variables to securely authenticate with the blockchain network.

Create the CDP client instance in your backend entry point, passing in your API credentials.
Check incoming requests for payment proofs and use the SDK to verify them before delivering data.
Configure payment-gated API routes
To serve premium research data through x402, you need to wrap your standard API endpoints with middleware that intercepts incoming requests. This middleware checks for a valid payment proof before the request reaches your actual data logic. If the proof is missing or invalid, the middleware returns a 402 Payment Required response immediately, ensuring no one can access your insights without paying.
1. Install the x402 middleware package
Start by adding the official x402 facilitator library to your project. This package provides the core functions needed to validate payment proofs from the blockchain. For Node.js or Next.js applications, you can install it via npm:
npm install @x402/facilitator
This library handles the complex interaction with the blockchain facilitator, verifying that the USDC (or other supported stablecoin) has been transferred to your designated wallet address.
2. Set up the payment verification logic
Create a middleware function that runs before your API route handlers. This function should extract the X-Client-Auth header from the incoming request, which contains the signed payment proof. The middleware then forwards this proof to the x402 facilitator for validation.
import { verifyPayment } from '@x402/facilitator';

export async function middleware(request) {
  const proof = request.headers.get('X-Client-Auth');

  if (!proof) {
    return new Response('Payment required', { status: 402 });
  }

  const isValid = await verifyPayment(proof);

  if (!isValid) {
    return new Response('Invalid payment proof', { status: 402 });
  }

  return NextResponse.next();
}
3. Define your protected API routes
Once the middleware is in place, apply it to the specific API routes that serve your premium research data. In Next.js, you can define these routes in the middleware.ts file or by using the export const config property to specify which paths require payment.
export const config = {
  matcher: '/api/research/:path*',
};
This ensures that any request to /api/research/... must pass the payment verification step. Requests to public endpoints, such as /api/public/status, remain unaffected.
4. Handle edge cases and error responses
Your middleware should gracefully handle network timeouts or facilitator unavailability. If the facilitator does not respond within a reasonable timeframe, return a 503 Service Unavailable error instead of a 402. This prevents your API from blocking legitimate users due to temporary infrastructure issues.
Additionally, log failed payment attempts for audit purposes. This helps you track potential fraud or debugging issues without exposing sensitive payment details in your logs.
Handle agent-commerce payment flows
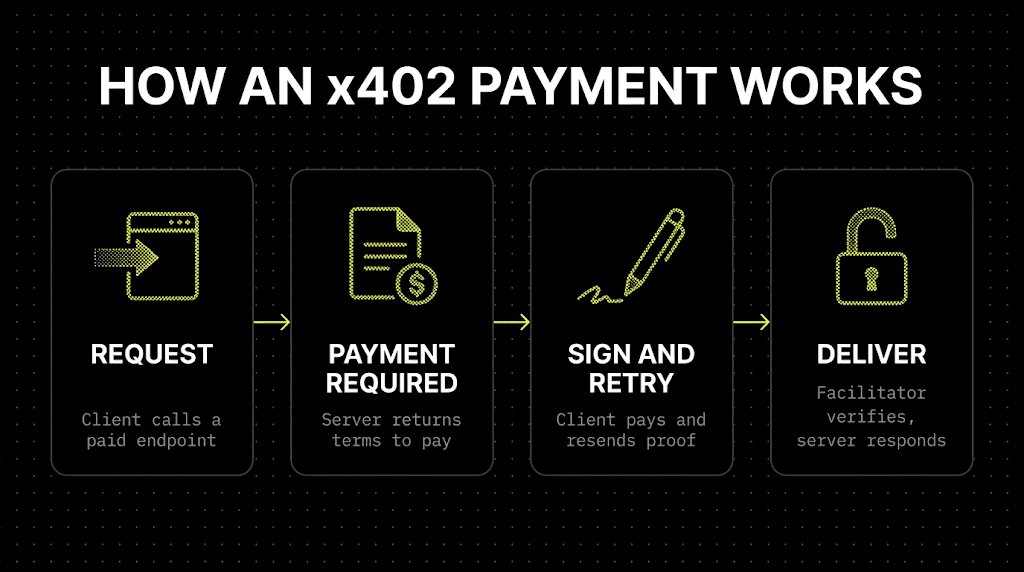
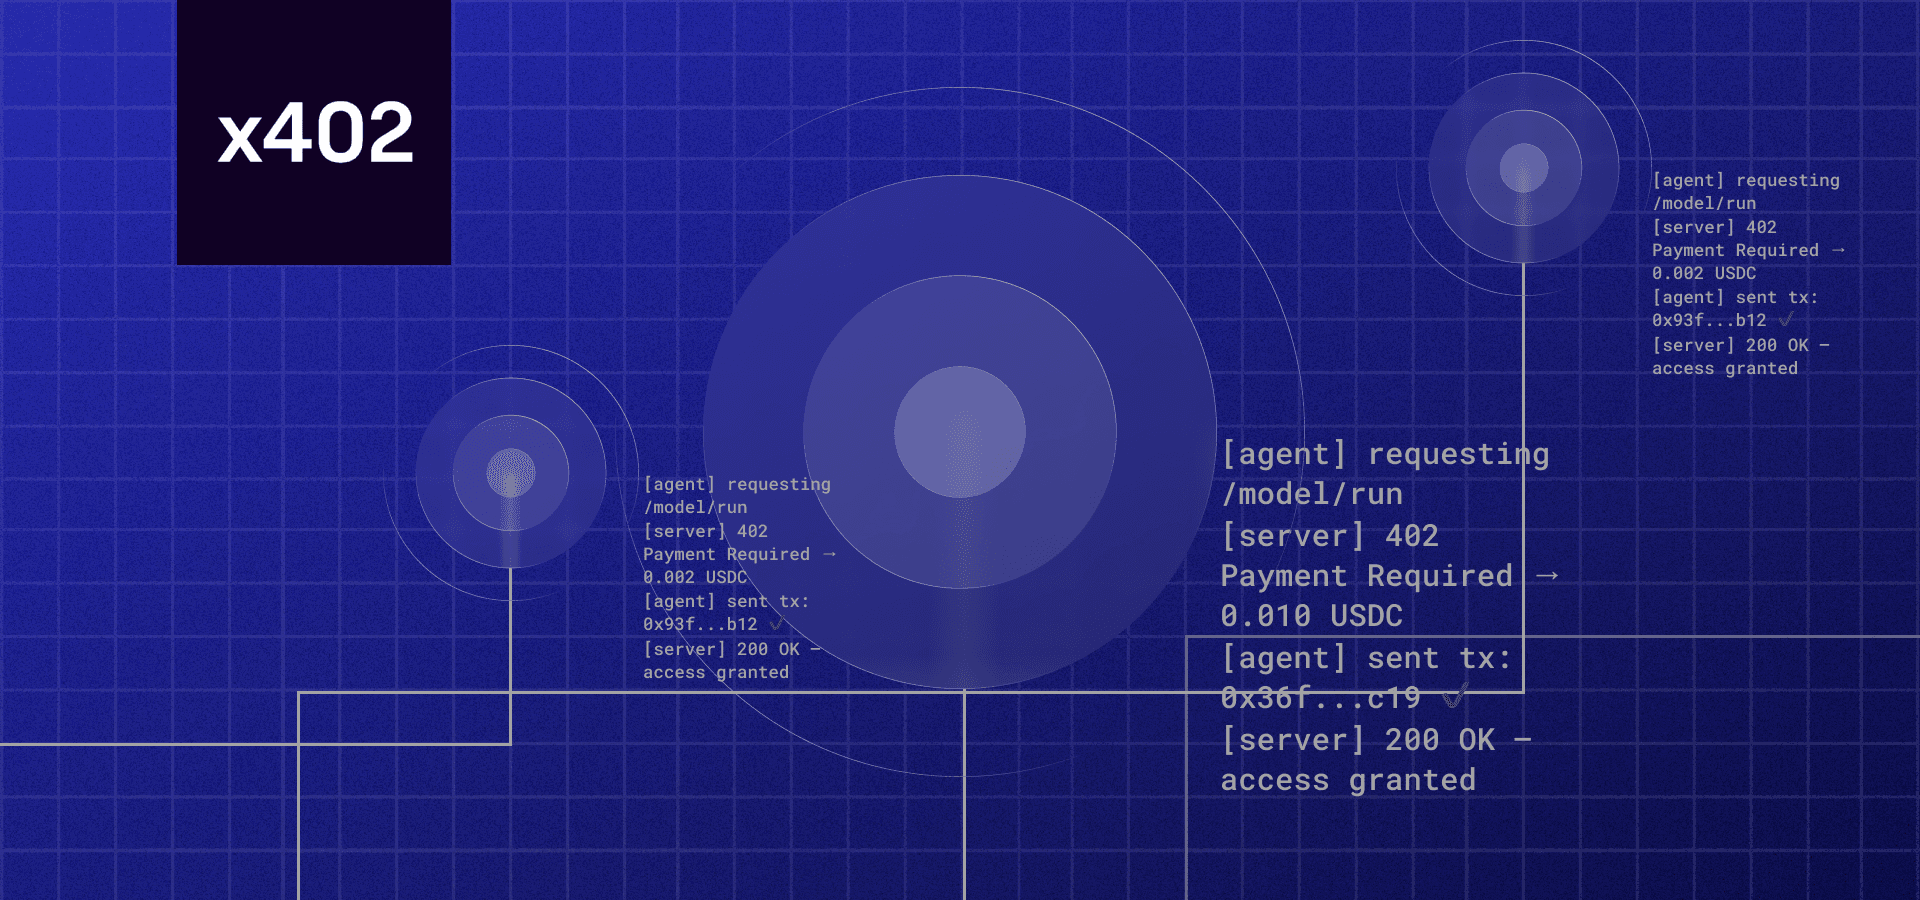
AI agents don’t browse; they transact. To make your premium research feed accessible to autonomous software, you need to build an endpoint that accepts payment as part of the request lifecycle. The x402 protocol simplifies this by embedding payment logic directly into the HTTP response, allowing agents to discover, pay, and access data without human intervention.
Discovery and Payment
The process begins when an agent queries your endpoint. Instead of returning data immediately, the server responds with a 402 Payment Required status code. This response includes a Payment-Required header that specifies the amount and the cryptocurrency address for payment. This is the standard handshake defined by x402.org, ensuring that any compliant agent recognizes the payment barrier.
Automatic Settlement
Once the agent receives the 402 response, it initiates a transaction. For premium research feeds, speed is critical. Agents typically use stablecoins like USDC on the Base network to settle the fee instantly. The payment is broadcast to the blockchain, and the agent waits for confirmation. This step transforms the endpoint from a static resource into a dynamic commerce node.
Granting Access
After the transaction is confirmed on-chain, your server verifies the payment. Upon successful verification, the endpoint returns a 200 OK status with the requested research data. This closed-loop system ensures that only paying agents access your premium content, automating revenue collection while maintaining strict access control. For detailed technical specifications on header formats and verification logic, refer to the official x402 documentation [2].
Test endpoints with stablecoin payments
Before you expose your premium research feed to the public, you need to verify that the x402 payment logic actually works. This section covers how to validate your endpoint using testnets or small USDC transactions. The goal is to catch integration errors early, ensuring that buyers—and their AI agents—can successfully pay for data without friction.
1. Set up a testnet environment
Start by deploying your endpoint on a testnet or using a local simulator that supports x402. This allows you to iterate quickly without risking real funds. Configure your API to accept test tokens, which mimic the behavior of mainnet USDC. This step isolates your code logic from network congestion or transaction failures that might occur on the live chain.
2. Validate the payment header structure
Use a tool like Postman or a simple script to send a request to your endpoint. Ensure the response includes the correct x-payment header or redirects to the payment flow as specified in the x402 protocol. If your endpoint returns data before payment, or fails to recognize a valid payment proof, the integration is broken. Check the Coinbase Developer Documentation for the exact header formats required for your specific chain.
3. Execute a small USDC transaction
Once the testnet logic holds, move to a live network with minimal funds. Send a small USDC transaction (e.g., $1) to your endpoint. This confirms that the on-chain settlement triggers the data release correctly. Watch for latency issues; premium data feeds often require near-instant confirmation, so ensure your endpoint handles the payment callback efficiently.
4. Verify data access post-payment
After the transaction is confirmed, make a second request to the endpoint. You should now receive the premium research data. If the data is still locked, check your access control logic. It’s common for developers to forget to update the user’s permission state after the payment is received. Ensure the endpoint checks the payment proof against the blockchain state before unlocking the content.
5. Monitor for edge cases
Test what happens when a payment fails or is reverted. Your endpoint should reject the request and return an appropriate error code. Also, test with invalid or expired payment proofs to ensure your security checks are robust. This step prevents attackers from bypassing payment by sending malformed requests.
Deploy your endpoint on a testnet to isolate payment logic from mainnet risks. Use test tokens to simulate USDC transactions without financial exposure.
Send test requests to ensure your API returns the correct x-payment headers or payment redirects. Verify alignment with the official x402 protocol specifications.
Perform a live $1 USDC transaction to confirm on-chain settlement triggers data release. Monitor latency to ensure near-instant confirmation for premium feeds.
Confirm premium data is unlocked post-payment. Test failure scenarios, such as reverted transactions or invalid proofs, to ensure robust access control.
Common x402 integration mistakes
Even with a clear implementation path, small oversights in header formatting or payment verification can break your endpoints. These errors often surface only after you’ve moved past the testnet phase, so catching them early saves significant debugging time.
Incorrect header formatting
The x-payments-accept and x-payments-url headers must follow the exact specification. A missing trailing slash or an incorrect content-type can cause agents to reject the payment request silently. Always validate the header structure against the official x402.org documentation before deploying.
Failing to handle 402 retries
Network interruptions are common. If your endpoint returns a 402 but doesn’t handle subsequent retries gracefully, users may face duplicate charges or incomplete data delivery. Implement idempotency keys in your response headers to ensure that repeated payment attempts don’t trigger multiple data fetches.
Exposing data before verification
Never serve premium research data until the payment status is confirmed as completed. Serving data on a pending or processing status exposes your content to free riders. Use a webhook listener or a polling mechanism to verify the transaction on-chain before releasing the payload.
Frequently asked questions about x402
Developers often encounter specific hurdles when integrating payment-gated APIs. The following answers address the most common technical constraints regarding latency, supported networks, and agent compatibility.
No comments yet. Be the first to share your thoughts!