Why x402 fits premium data
Traditional API access models—subscriptions and API keys—create friction for premium research feeds. They require account creation, billing cycles, and often restrict usage in ways that don't align with how data is actually consumed. x402 changes this by treating data as a pay-per-use commodity, settled instantly over HTTP using stablecoins.
This protocol allows AI agents and human users to pay only for the specific data points they need. There are no monthly retainers for unused capacity and no complex authentication tokens to manage. The payment happens in the same request that fetches the data, removing the need for separate billing portals or credit checks.
For high-value, low-frequency research, this model is superior. You pay for the insight, not the infrastructure. This aligns costs directly with value, making it ideal for sporadic but critical queries that traditional subscriptions would treat as overhead.
The technology leverages HTTP 402 "Payment Required" status codes to facilitate these transactions natively within the web protocol. Developed by Coinbase and documented at x402.org, this open standard ensures that payments are automatic, instant, and transparent. It shifts the paradigm from "access control" to "value exchange."
By eliminating the administrative burden of subscription management, developers can focus on building better data endpoints. Researchers get immediate access to premium insights without waiting for billing approvals. This simplicity is what makes x402 the natural fit for modern, high-value data services.
Set up the payment facilitator
To accept x402 payments, you need a bridge between your API and the blockchain. This bridge is called a payment facilitator. It handles the cryptographic heavy lifting: verifying that the user has signed the correct payment intent and managing the stablecoin transfer.
You can build this yourself, but using an official facilitator SDK is faster and less error-prone. Coinbase and Thirdweb both provide robust libraries that integrate directly into your server environment. We will use the Coinbase Developer Platform (CDP) SDK as our primary example, as it is the reference implementation for the x402 protocol.
1. Install the SDK
Start by adding the Coinbase CDP package to your project. This library provides the core functions for generating payment intents and verifying signatures.
npm install @coinbase/coinbase-sdk
2. Configure your environment
You need to authenticate your server with Coinbase. Create a .env file in your project root and add your API credentials. Never hardcode these values.
COINBASE_API_KEY=your_api_key
COINBASE_PRIVATE_KEY=your_private_key
Import these into your facilitator setup script. The SDK uses these keys to sign requests on behalf of your endpoint.
3. Initialize the facilitator
Create a new instance of the facilitator. This object will manage your wallet and handle the payment flow. You need to specify the network (mainnet or testnet) and the currency (usually USDC).
import { Coinbase } from '@coinbase/coinbase-sdk';

const facilitator = new Coinbase({
  network: 'base-sepolia', // Use mainnet for production
  currency: 'USDC'
});
4. Generate the payment intent
When a client requests your premium research data, your API should generate a payment intent. This is a structured object that describes the price, the recipient, and the data being sold. The facilitator signs this intent with your private key.
const intent = await facilitator.createPaymentIntent({
  amount: '1.00',
  recipient: 'your_wallet_address',
  description: 'Premium Research Feed Access'
});
5. Return the intent to the client
Send the signed intent back to the client in your API response. The client’s wallet will use this intent to construct the transaction. The x402 protocol requires the client to attach the signature to the request header.
{
  "paymentIntent": "<signed_intent_string>",
  "paymentUrl": "<url_for_payment_verification>"
}
6. Verify the payment
Once the client sends the request with the payment header, your facilitator verifies the signature. If valid, it releases the data. If not, it returns a 402 Payment Required error.
const isValid = await facilitator.verifyPaymentIntent(intent, request.headers);
if (!isValid) {
  return res.status(402).send('Payment required');
}
This setup ensures that your premium research feed is protected by cryptographic proof of payment. The facilitator handles the complexity, allowing you to focus on delivering high-quality data.


As an Amazon Associate, we may earn from qualifying purchases.
Configure the HTTP 402 response
When your endpoint detects that a client hasn't provided valid payment, you don't just send a generic error. You send an HTTP 402 status code, which is the specific signal defined in the x402 specification for "Payment Required." This response acts as the bridge between your premium research feed and the client's AI agent or wallet.
The core of this configuration is the Paywalled-Resource header. This header tells the client exactly where the payment proof is located and what format it must take. According to the x402 protocol, this header should point to a JSON-LD payment document. The document itself contains the transaction details, the amount due, and the destination wallet address. Without this header, the client doesn't know how to proceed, and the payment flow breaks.
You should structure your response to include three key elements:
- Status Code: Return
402 Payment Requiredimmediately. - Paywalled-Resource Header: Include the URL or inline JSON-LD of the payment document.
- WWW-Authenticate Header: (Optional) Specify the payment method or protocol version if you support multiple options.
This structure ensures that any compliant x402 client can parse the response, understand the debt, and execute the payment automatically. The client reads the Paywalled-Resource, constructs a payment transaction, and resends the request with the proof in the Authorization header.
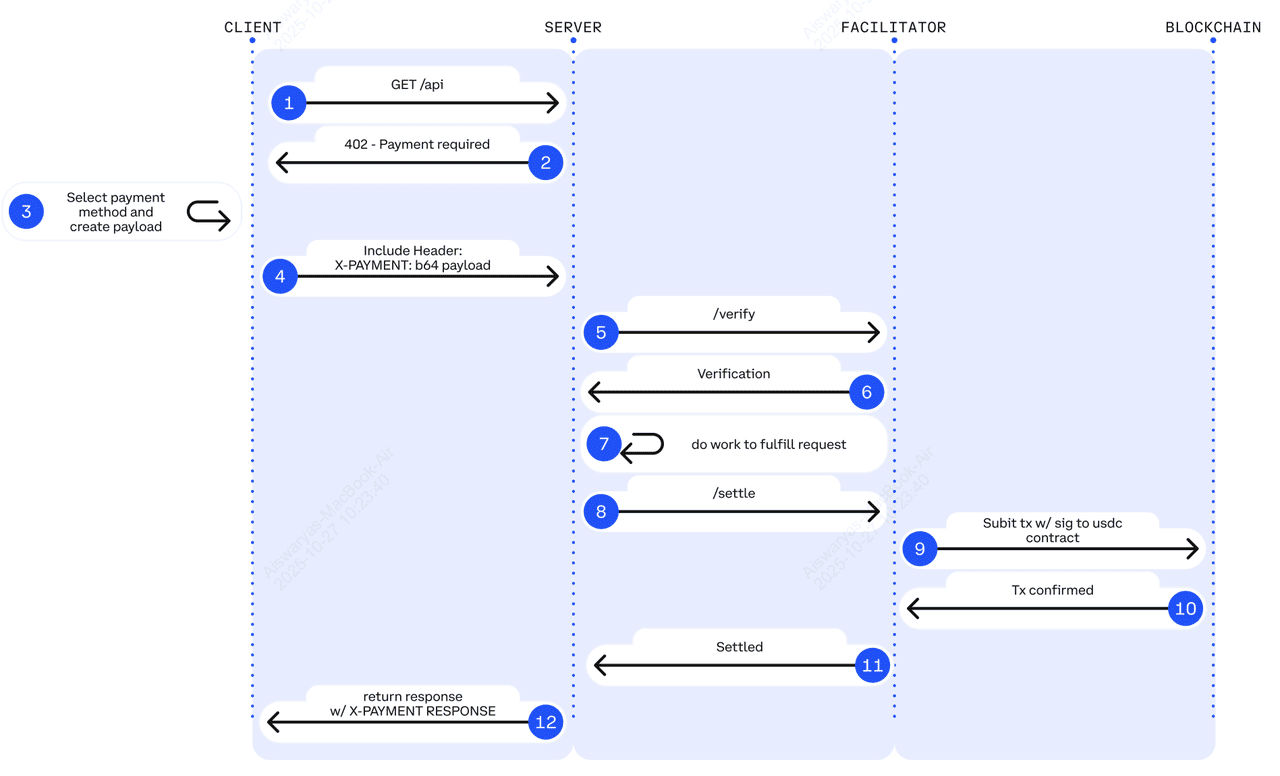
Verify payment before serving data
You cannot release sensitive research data until the on-chain payment is confirmed and irreversible. In the x402 protocol, a simple HTTP request with a token is not enough; you must validate the transaction against the blockchain to ensure the funds have actually arrived and cannot be reversed via a chain reorg or double-spend attempt.
This step is the gatekeeper of your premium feed. If you skip verification or accept unconfirmed transactions, attackers can drain your resources by sending tokens that never settle. For premium research feeds, where data integrity and access control are paramount, this validation logic must be rigorous.
The Verification Checklist
Before rendering your JSON response or streaming data, run through this specific validation sequence. Each step must pass before you proceed to the next.
-
Confirm Transaction Hash: Extract the x402-transaction-hash header from the incoming request. Ensure it is a valid, non-empty string matching your target blockchain's format (e.g., 0x-prefixed for EVM chains).
-
Check Block Confirmations: Query the blockchain for the transaction's status. For high-stakes data, wait for at least 12-20 confirmations on Ethereum or equivalent finality periods on other chains. This prevents accepting payments that might be reverted during a chain reorganization.
-
Verify Recipient Address: Confirm that the transaction's to address matches your server's designated wallet address exactly. Mismatched addresses indicate a misconfigured client or an attempt to pay a different endpoint.
-
Validate Amount: Ensure the value sent in the transaction meets or exceeds the price defined in your x402-price header. Reject transactions that underpay, even by a small margin.
Implementation Logic
Your server should act as a lightweight blockchain client or use a reliable indexer like Etherscan or Blockchair to fetch transaction details. Do not rely solely on the client-provided hash; always fetch the on-chain state independently.
// Pseudocode for verification logic
async function verifyPayment(txHash, expectedAddress, expectedAmount) {
  const tx = await blockchainClient.getTransaction(txHash);

  if (tx.to.toLowerCase() !== expectedAddress.toLowerCase()) {
    throw new Error('Invalid recipient address');
  }

  if (tx.value < expectedAmount) {
    throw new Error('Insufficient payment');
  }

  if (tx.confirmations < MIN_CONFIRMATIONS) {
    throw new Error('Transaction not yet confirmed');
  }

  return true;
}
If any of these checks fail, return a 402 Payment Required status code with a clear error message. This allows the client to retry with a correct transaction. Only after all checks pass should you serve the research data, ensuring your premium content is protected from unauthorized access.
Handle common integration errors
Even with a solid x402 implementation, you will likely hit snags during testing. Most failures stem from three predictable issues: nonce mismatches, insufficient gas, or delayed block confirmations. Fixing these requires checking your headers, wallet balance, and transaction status in the right order.
Nonce mismatches
The x402 protocol relies on a unique nonce to prevent replay attacks. If your client sends a nonce that is lower than the server’s expected value, the request fails immediately. This usually happens when you restart a test environment without clearing the server’s state. Always verify that the x402-nonce header matches the latest value returned by the endpoint. If you are testing locally, restart your server to reset the nonce counter.
Insufficient gas
Payments in x402 are executed on-chain, so your wallet must hold enough native currency to cover the gas fees. A common mistake is assuming the payment amount covers the transaction cost. It does not. Ensure your funding wallet has a buffer of at least 10-20% above the expected gas limit. If the transaction reverts, check the gas price settings in your web3 library and increase them if the network is congested.
Delayed block confirmations
After the payment transaction is broadcast, the server must wait for a block confirmation before serving the data. If your code returns data immediately after signing, the server will reject it because the transaction is not yet final. Implement a retry loop that checks the transaction receipt status. Only proceed once the block confirmations meet your threshold—typically 1-3 blocks for most L2s.

Frequently asked: what to check next
Work through to x402 Endpoints for Premium Research Feeds
No comments yet. Be the first to share your thoughts!