Set up the x402 facilitator
To build premium research feeds that actually get paid, you need a payment facilitator. Instead of writing custom smart contract logic to verify on-chain transactions, connect your API to an x402 facilitator like Thirdweb or the Coinbase Developer Platform (CDP). These services handle the heavy lifting: they verify that a user has sent the required USDC to your endpoint and then allow access to the data.
This setup acts as the gatekeeper for your API. When a client requests a research endpoint, the facilitator intercepts the request, checks for the payment proof, and only returns the data if the transaction is valid. This allows you to focus on building the research logic rather than managing blockchain state.
Install the facilitator SDK
Start by installing the specific SDK for your chosen facilitator. If you are using Thirdweb, you will install their @thirdweb-dev/sdk and the x402 middleware package. For Coinbase CDP, you will use their @coinbase/developer-platform-sdk. Ensure your environment is set to the Base network, as this is the primary chain for x402 transactions due to low fees and fast settlement.
Configure environment variables
Next, configure your environment variables with your facilitator credentials. You will need your API key or private key, depending on the provider. Set the CHAIN_ID to 8453 (Base) and define your wallet address. These variables allow the middleware to sign payment proofs and verify incoming requests without hardcoding sensitive data into your application.
Initialize the middleware
Finally, initialize the x402 middleware in your API route handler. Wrap your existing API logic with the facilitator’s verification function. This ensures that every request is checked for a valid x402 proof before your research data is returned. If the payment is missing or invalid, the facilitator will reject the request, protecting your premium content from unauthorized access.
Run the installation command for your chosen provider. For Thirdweb, use npm install @thirdweb-dev/sdk. For Coinbase CDP, use npm install @coinbase/developer-platform-sdk. Ensure you are targeting the Base network by setting the appropriate chain ID in your configuration.
Add your facilitator credentials to your .env file. Set CHAIN_ID to 8453 for Base. Define your wallet address and any required API keys. These variables allow the middleware to sign payment proofs and verify incoming requests securely.
Wrap your API route handler with the facilitator’s verification function. This ensures every request is checked for a valid x402 proof before your research data is returned. If the payment is missing or invalid, the facilitator will reject the request.
Configure the 402 response middleware
Setting up the middleware is where you define the rules for your x402 endpoints. The middleware acts as a gatekeeper, intercepting incoming requests before your application logic runs. If the request lacks a valid payment signature, the middleware returns an HTTP 402 status code with the necessary payment instructions.
This process ensures that consumers know exactly how much to pay, in which currency, and on which blockchain to get the data they need. By handling this logic at the middleware layer, you keep your core application clean and focused on delivering the premium research feed.
Start by defining the specific payment details for your endpoint. This includes the amount (usually in the smallest unit, like cents or wei), the currency (e.g., USD or USDC), and the chain ID where the payment should be made. These parameters are embedded in the 402 response so the client can construct the correct payment transaction.
Attach your middleware to the specific route or group of routes serving the premium data. When a request hits this route, the middleware first checks for an existing x-payproof header. If the header is missing or invalid, the middleware stops the request and generates the 402 response. This validation step is critical to prevent replay attacks and ensure only paying users access the data.
When validation fails, return a JSON response with the HTTP 402 status code. This JSON must include the amount, currency, chain, and a payment_uri or refund_address as specified by the x402 standard. The client uses this data to initiate the payment transaction. Once the payment is confirmed on-chain, the client includes the signature in subsequent requests to bypass the middleware.


As an Amazon Associate, we may earn from qualifying purchases.
By following these steps, you create a robust x402 endpoint that seamlessly integrates micropayments into your research feed. This approach not only monetizes your data but also aligns with the emerging standard for HTTP-native payments.
Handle USDC settlement on Base
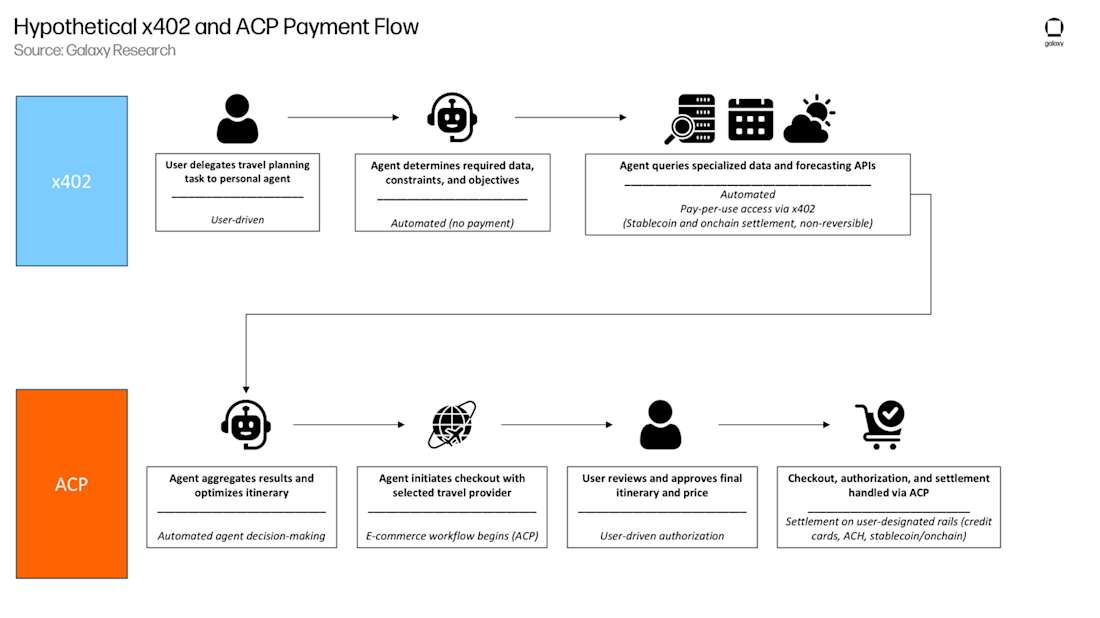
High-frequency research feeds require payment mechanisms that don't introduce latency. Using USDC on the Base network satisfies this need by combining the stability of a major stablecoin with the speed and low cost of a layer-2 blockchain.
The x402 protocol is designed to work seamlessly with this stack, allowing for 2-second settlement times. This speed is critical when serving real-time market data or compliance feeds, where the value of the information drops rapidly. Consumers pay only for the data they access, and the transaction settles almost instantly.
To implement this, you need to configure your endpoint to verify USDC transfers on Base. The process involves checking the transaction hash provided in the x-pay header against the Base blockchain. If the transfer is confirmed, you grant access to the data.
This approach removes the friction of traditional payment processors. There are no chargebacks, no multi-day settlement windows, and negligible gas fees compared to Ethereum mainnet. Your endpoint becomes a self-contained payment gateway, ready for automated agents or high-volume API consumers.
Structure the premium data payload
Once the x402 payment proof is verified, your endpoint must return the actual research data. This payload is the core asset you are selling, so it needs to be structured clearly and securely. The format you choose—JSON, CSV, or a binary blob—depends on your audience, but the delivery mechanism must remain consistent with the x402 specification.
Start by deciding on the output format. JSON is the standard for API-driven research feeds because it is lightweight and easy to parse. If your audience prefers raw data for local analysis, CSV or Parquet formats work well. Clearly document this schema so developers know exactly what fields to expect, such as timestamp, symbol, or confidence_score.
Don't just return raw data. Wrap your payload in a structured JSON object that includes metadata. This helps clients distinguish between the data itself and the context, such as the data source, the version of the endpoint, or the expiration time of the dataset. This structure makes your API more robust and easier to debug for end-users.
To prevent tampering, consider adding a digital signature or a hash to your payload. This ensures that the data delivered hasn't been altered in transit. While x402 handles the payment verification, the data integrity itself is your responsibility. A simple SHA-256 hash included in the response headers can give buyers confidence in the data's authenticity.
Premium research data often changes frequently. Use Cache-Control headers to define how long clients should store the data. For real-time market feeds, set a short TTL (time-to-live). For daily reports, you can allow longer caching. This reduces your server load and ensures users get fresh data without unnecessary API calls.
If the data is temporarily unavailable or the query fails, return a clear HTTP error code (like 503) with a JSON error object. Never leak internal server details. Provide a message that helps the developer understand the issue, such as "Data feed temporarily unavailable" or "Invalid query parameters," so they can adjust their integration.
Checklist
-
Verify the payment signature is valid before generating the payload
-
Ensure the data schema matches your API documentation
-
Include metadata (version, timestamp, source) in the response
-
Set Cache-Control headers to manage data freshness
-
Log the transaction hash for audit trails
Common integration mistakes to avoid
Even with a clear spec, building x402 endpoints for premium research feeds requires careful attention to detail. A single misstep in status code handling or proof validation can break the payment flow or expose your data to unauthorized access. Below are the most frequent pitfalls developers encounter and how to sidestep them.
No comments yet. Be the first to share your thoughts!